OLED Displays: A Beginner'south Guide to Display Text, Paradigm & Blitheness Using Arduino.
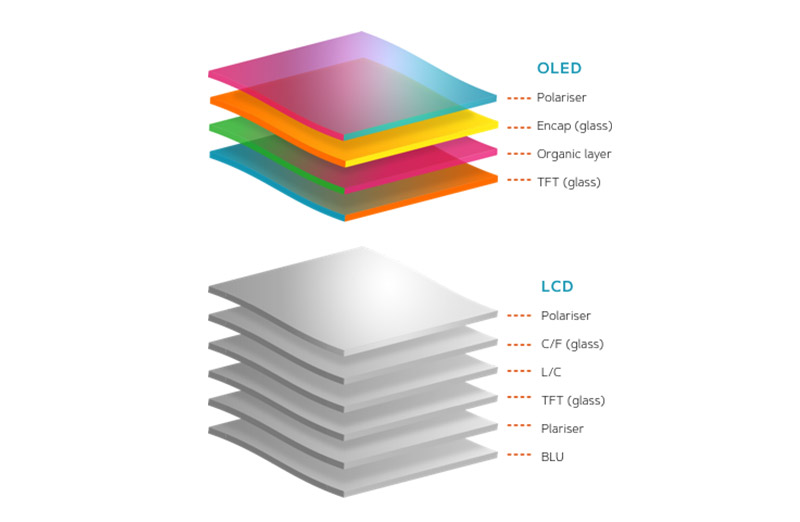
An organic low-cal-emitting diode (OLED) is a high-contrast and high-resolution display, making it like shooting fish in a barrel for users to exist readable. This kind of displays doesn't accept a backlight and create the backlight themselves and this makes them sharper, clearer and smoother than LCDs. American concrete pharmacist Ching Due west. Tang and Steven Van Slyke at Eastman Kodak built the get-go practical OLED device in 1987. Nowadays we tin can see the upgraded generation of OLED similar Super AMOLED and AMOLED Plus of SAMSUNG and POLED of LG.
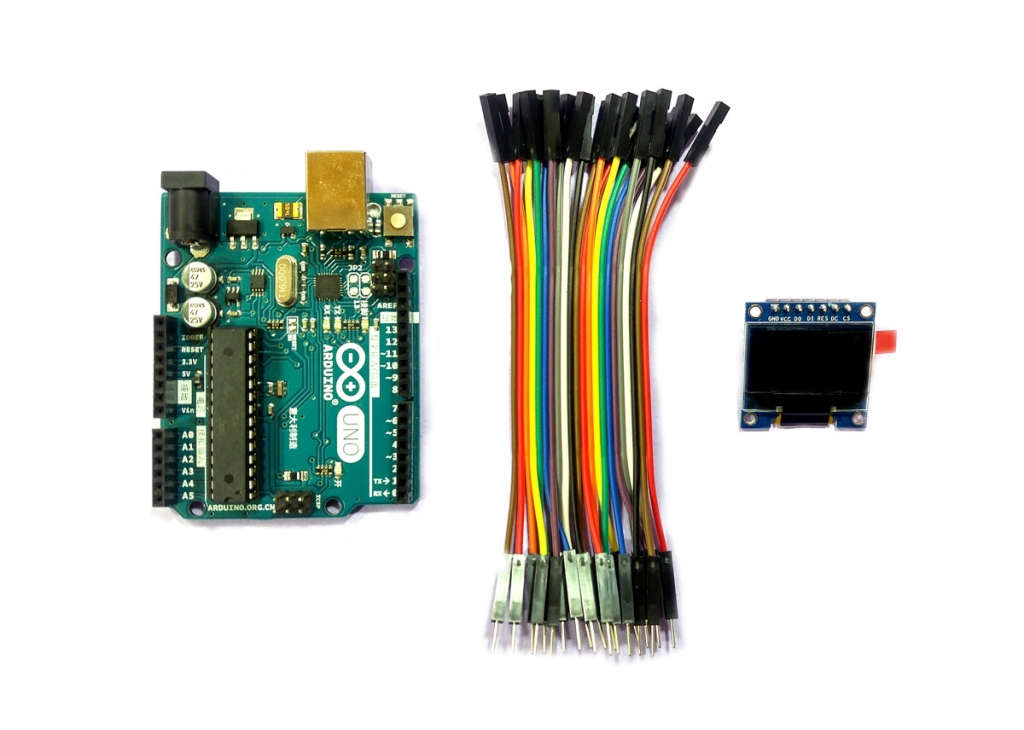
Small OLED modules are very useful in electronics projects. Simple wiring and loftier readability of displays are suitable for showing data, numbers and simple images. You can find different size and colors of these panels with unlike resolutions. Based on your project, you lot tin can choose parallel, SPI or I2C model. There are monochrome, 2 colors and 16-bit full-color panels to utilise. We cull a 128*64, 0.96 inch, SPI OLED display with SSD1306 commuter and Arduino UNO. Read the rest of this commodity to acquire how to brandish text and images on OLED displays.
If you don't accept the components or don't want to purchase them, you can endeavor it by Proteus simulation and edit information technology by your interest. Download the following project file.
Necessary Files and Downloads:
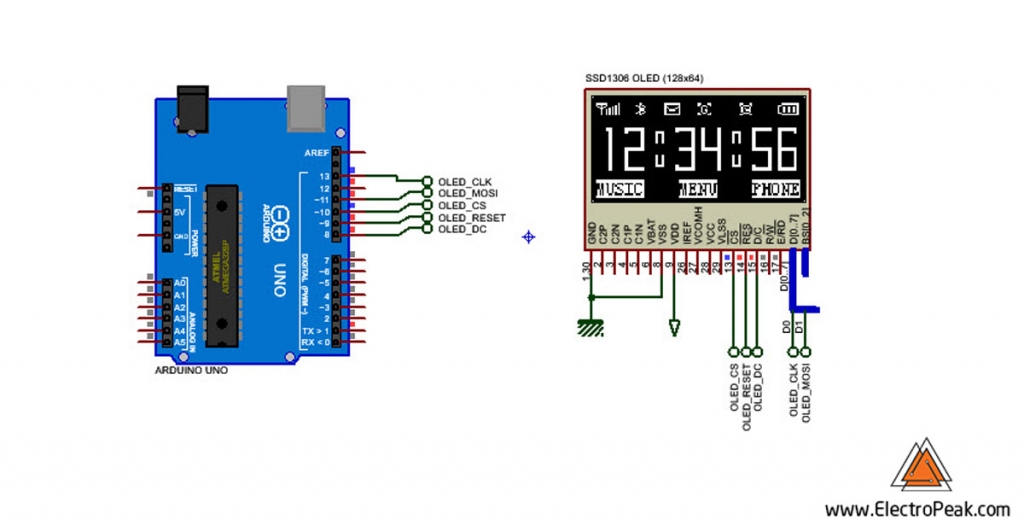
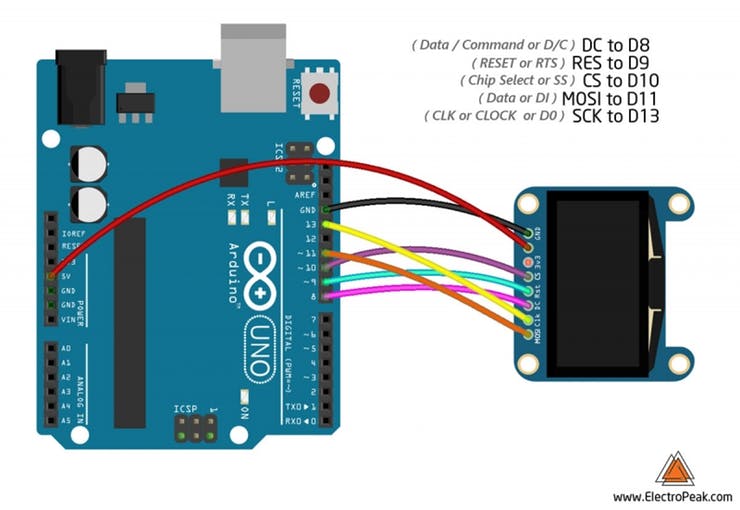
There are different SPI OLED displays with different pin names. Use the circuit illustration above to find out the meaning of your module pin names. Almost of the OLED modules work with three.3 Volt power too. Y'all can change the pin of Arduino but yous must modify information technology in the code too.
You tin can apply a breadboard and male to male person jumper wire to practice it. It'south now time to upload the code.
In that location are a lot of Libraries written for OLED modules. In this article, We have used the WaveShare OLED SSD1306 Library. It's not complicated and you tin can even alter the library co-ordinate to your lawmaking. You must starting time add the library and and so upload the lawmaking. If it is the first time you run an Arduino lath, don't worry. Just follow these steps:
- Go to www.arduino.cc/en/Chief/Software and download the software of your Os. Install the IDE software equally instructed.
- Run the Arduino IDE and clear the text editor and re-create the following code in the text editor.
- Navigate to sketch and include the libraries (Download libraries from the following links). At present click add Aught library and add together the libraries
- Choose the board in tools and boards, select Arduino UNO.
- Connect the Arduino to your PC and set the COM port in tools and port.
- Printing the Upload (Arrow sign) push button.
- Yous are all ready!
Necessary Files and Downloads:
To display text or image on an OLED brandish, y'all should outset write your data to a buffer, and then show the buffer on the OLED. You can employ these commands:
SSD1306_begin() : Initialize the OLED Brandish.
SSD1306_clear(…) : Make clean the Brandish.
SSD1306_string(ten position, y position,… ) : Add a text to buffer.
SSD1306_char3216(x position, y position,…) : Add a catheter to buffer.
SSD1306_display(name of buffer) : Show the buffer on Brandish.
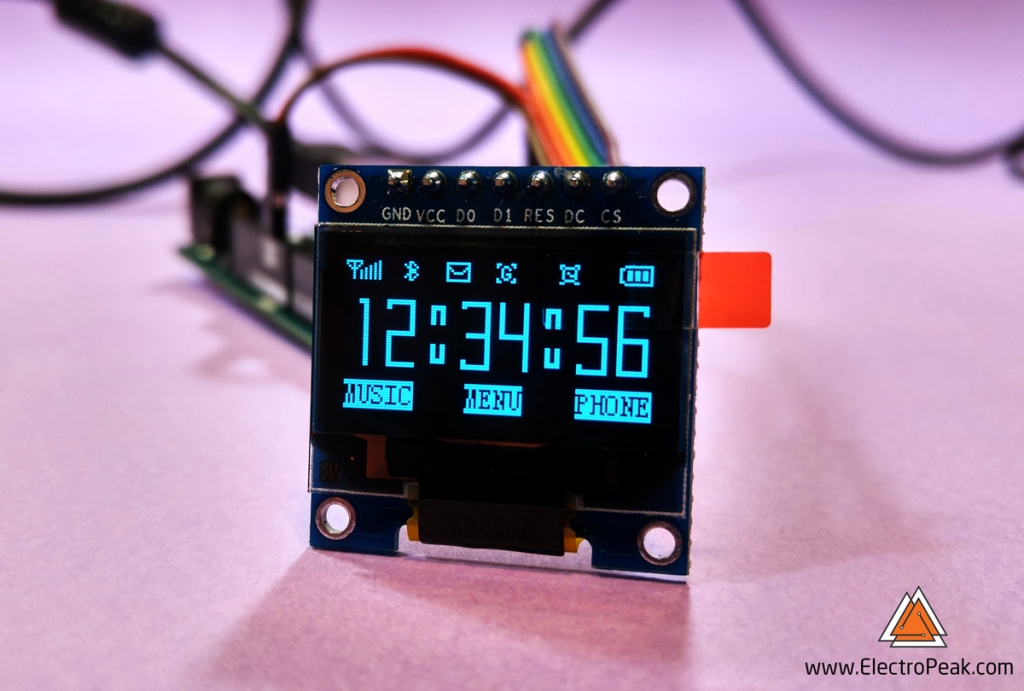
Here is the full code to display text on your OLED brandish:
#include "ssd1306.h" #define VCCSTATE SSD1306_SWITCHCAPVCC #define WIDTH 128 #ascertain Acme 64 #define PAGES 8 #define OLED_RST 9 #define OLED_DC viii #define OLED_CS 10 #define SPI_MOSI xi /* connect to the DIN pin of OLED */ #ascertain SPI_SCK thirteen /* connect to the CLK pivot of OLED */ uint8_t oled_buf[WIDTH * HEIGHT / 8]; void setup() { Serial.begin(9600); Serial.print("OLED Example\n"); SSD1306_begin(); SSD1306_clear(oled_buf); /* display images of bitmap matrix */ SSD1306_bitmap(0, 2, Signal816, xvi, 8, oled_buf); SSD1306_bitmap(24, 2,Bluetooth88, 8, 8, oled_buf); SSD1306_bitmap(40, 2, Msg816, sixteen, eight, oled_buf); SSD1306_bitmap(64, 2, GPRS88, eight, 8, oled_buf); SSD1306_bitmap(90, 2, Alarm88, 8, 8, oled_buf); SSD1306_bitmap(112, 2, Bat816, xvi, 8, oled_buf); SSD1306_string(0, 52, "MUSIC", 12, 0, oled_buf); SSD1306_string(52, 52, "MENU", 12, 0, oled_buf); SSD1306_string(98, 52, "Phone", 12, 0, oled_buf); SSD1306_char3216(0, 16, '1', oled_buf); SSD1306_char3216(16, 16, '2', oled_buf); SSD1306_char3216(32, 16, ':', oled_buf); SSD1306_char3216(48, 16, '3', oled_buf); SSD1306_char3216(64, xvi, '4', oled_buf); SSD1306_char3216(eighty, 16, ':', oled_buf); SSD1306_char3216(96, sixteen, '5', oled_buf); SSD1306_char3216(112, 16, '6', oled_buf); SSD1306_display(oled_buf); } void loop() { }
Past using SSD1306_bitmap(…) command, you can add a bitmap prototype to buffer.
The OLED library has a few icons already. (like Alarm88, Bluetooth88, etc.) You lot tin can use them in your code.
#include <ssd1306.h> #ascertain VCCSTATE SSD1306_SWITCHCAPVCC #define WIDTH 128 #ascertain HEIGHT 64 #define PAGES 8 #define OLED_RST 9 #define OLED_DC viii #define OLED_CS 10 #ascertain SPI_MOSI xi /* connect to the DIN pin of OLED */ #define SPI_SCK 13 /* connect to the CLK pin of OLED */ uint8_t oled_buf[WIDTH * HEIGHT / 8]; void setup() { Series.begin(9600); Series.print("OLED Instance\n"); SSD1306_begin(); SSD1306_clear(oled_buf); /* display images of bitmap matrix */ SSD1306_bitmap(0, 2, Signal816, sixteen, 8, oled_buf); SSD1306_bitmap(24, 2,Bluetooth88, 8, 8, oled_buf); SSD1306_bitmap(40, 2, Msg816, xvi, 8, oled_buf); SSD1306_bitmap(64, 2, GPRS88, 8, 8, oled_buf); SSD1306_bitmap(xc, two, Alarm88, viii, 8, oled_buf); SSD1306_bitmap(112, 2, Bat816, 16, 8, oled_buf); SSD1306_string(0, 52, "MUSIC", 12, 0, oled_buf); SSD1306_string(52, 52, "MENU", 12, 0, oled_buf); SSD1306_string(98, 52, "Telephone", 12, 0, oled_buf); SSD1306_char3216(0, 16, 'one', oled_buf); SSD1306_char3216(xvi, 16, '2', oled_buf); SSD1306_char3216(32, 16, ':', oled_buf); SSD1306_char3216(48, 16, '3', oled_buf); SSD1306_char3216(64, 16, '4', oled_buf); SSD1306_char3216(80, 16, ':', oled_buf); SSD1306_char3216(96, 16, '5', oled_buf); SSD1306_char3216(112, 16, 'vi', oled_buf); SSD1306_display(oled_buf); } void loop() { }
To brandish an prototype, y'all have to catechumen it to a hex code. There are several applications that convert an image and to a hex code. Yous can download one of them from the following link. Start, run the software and open an image from File carte du jour. Your image size should be smaller than 128*64 pixels. And then click conversion from Option carte and be certain the settings are the same equally the following image.
Necessary Files and Downloads:
Click Convert from File menu . Now open the .c file and re-create the hex code. In the main code, add together the hex code in the following format.
Now, add the post-obit line to the loop.
Information technology's done, Upload the lawmaking to Arduino.
Displaying animation on OLEDs is a bit tricky. An animation consists of several images displayed continuously at a high speed. Here we exercise the aforementioned. We volition display the frames of animation right after each other.
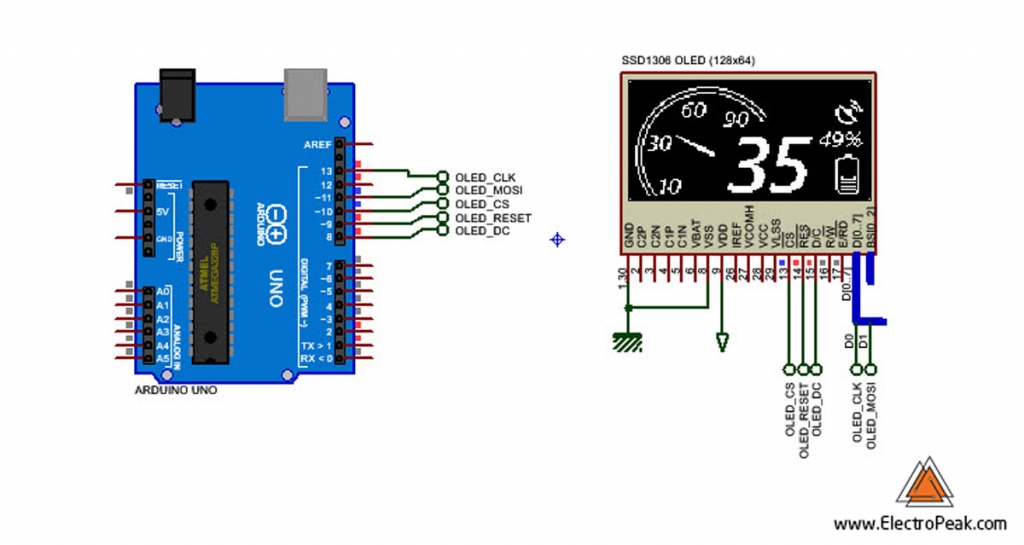
Here is an example of a gauge and text display:
Necessary Files and Downloads:
To salve on retention usage, you can split your animation to static and dynamic parts and simply change the dynamic part for each frame. In this example, the animation frames only contain the pointer and numbers and the rest is a static image.
- Try to evidence sensors information on the OLED. (similar dht11 sensor)
- Build a watch by OLED and RTC module. (prove date and time)


satya Answer
I want to interface the OLED Display (0.96) Inches four pin display and i connected with arduino uno with example lawmaking I don't know to how to classify address in particular place ibn oled display tin can anybody provide the solution nigh this code Thankyou
November 22, 2019 at two:17 pm
Saeed Hosseini Answer
Hi.
try adafruit library for OLED
November 24, 2019 at 10:49 am
Saeed Hosseini Reply
Thank you lot
January 26, 2020 at 1:12 pm
John Kavanagh Answer
Hi
Strangely I cannot seem to resolve this error I continually get (below) I accept several displays with other projects, all libraries appear to be in identify. I accept stripped the lawmaking downwardly to an verbal copy of the main code below, however I am not having any luck in resolving this issue, hope you can help…
error: 'SSD1306_begin' was not declared in this scope
——————————————————————————————————————–
#include "ssd1306.h"
#define VCCSTATE SSD1306_SWITCHCAPVCC
#define WIDTH 128
#define Peak 64
#define PAGES 8
#define OLED_RST 9
#define OLED_DC 8
#define OLED_CS 10
#define SPI_MOSI xi /* connect to the DIN pin of OLED */
#define SPI_SCK 13 /* connect to the CLK pin of OLED */
uint8_t oled_buf[WIDTH * HEIGHT / eight];
void setup() {
Serial.begin(9600);
Series.print("OLED Example\northward");
SSD1306_begin();
SSD1306_clear(oled_buf);
/* display images of bitmap matrix */
SSD1306_bitmap(0, 2, Signal816, 16, eight, oled_buf);
SSD1306_bitmap(24, 2,Bluetooth88, 8, 8, oled_buf);
SSD1306_bitmap(40, 2, Msg816, 16, 8, oled_buf);
SSD1306_bitmap(64, 2, GPRS88, viii, viii, oled_buf);
SSD1306_bitmap(90, two, Alarm88, 8, 8, oled_buf);
SSD1306_bitmap(112, 2, Bat816, 16, 8, oled_buf);
SSD1306_string(0, 52, "MUSIC", 12, 0, oled_buf);
SSD1306_string(52, 52, "MENU", 12, 0, oled_buf);
SSD1306_string(98, 52, "Phone", 12, 0, oled_buf);
SSD1306_char3216(0, 16, '1', oled_buf);
SSD1306_char3216(sixteen, xvi, 'two', oled_buf);
SSD1306_char3216(32, xvi, ':', oled_buf);
SSD1306_char3216(48, 16, '3', oled_buf);
SSD1306_char3216(64, sixteen, '4', oled_buf);
SSD1306_char3216(80, 16, ':', oled_buf);
SSD1306_char3216(96, 16, 'five', oled_buf);
SSD1306_char3216(112, 16, 'half-dozen', oled_buf);
SSD1306_display(oled_buf);
}
void loop() {
}
May eleven, 2021 at 9:59 pm
Mehran Maleki Answer
Hello.
The issue you're having is manifestly related to the library y'all use. What the mistake is saying is that the function "SSD1306_begin()" does non exist in the library. The error might get away if you only delete that line. And generally speaking, in order to troubleshoot such issues yous can open the .h and .cpp files of the library and have a look at the functions that are available.
May 12, 2021 at 5:12 am